

What's in a backup
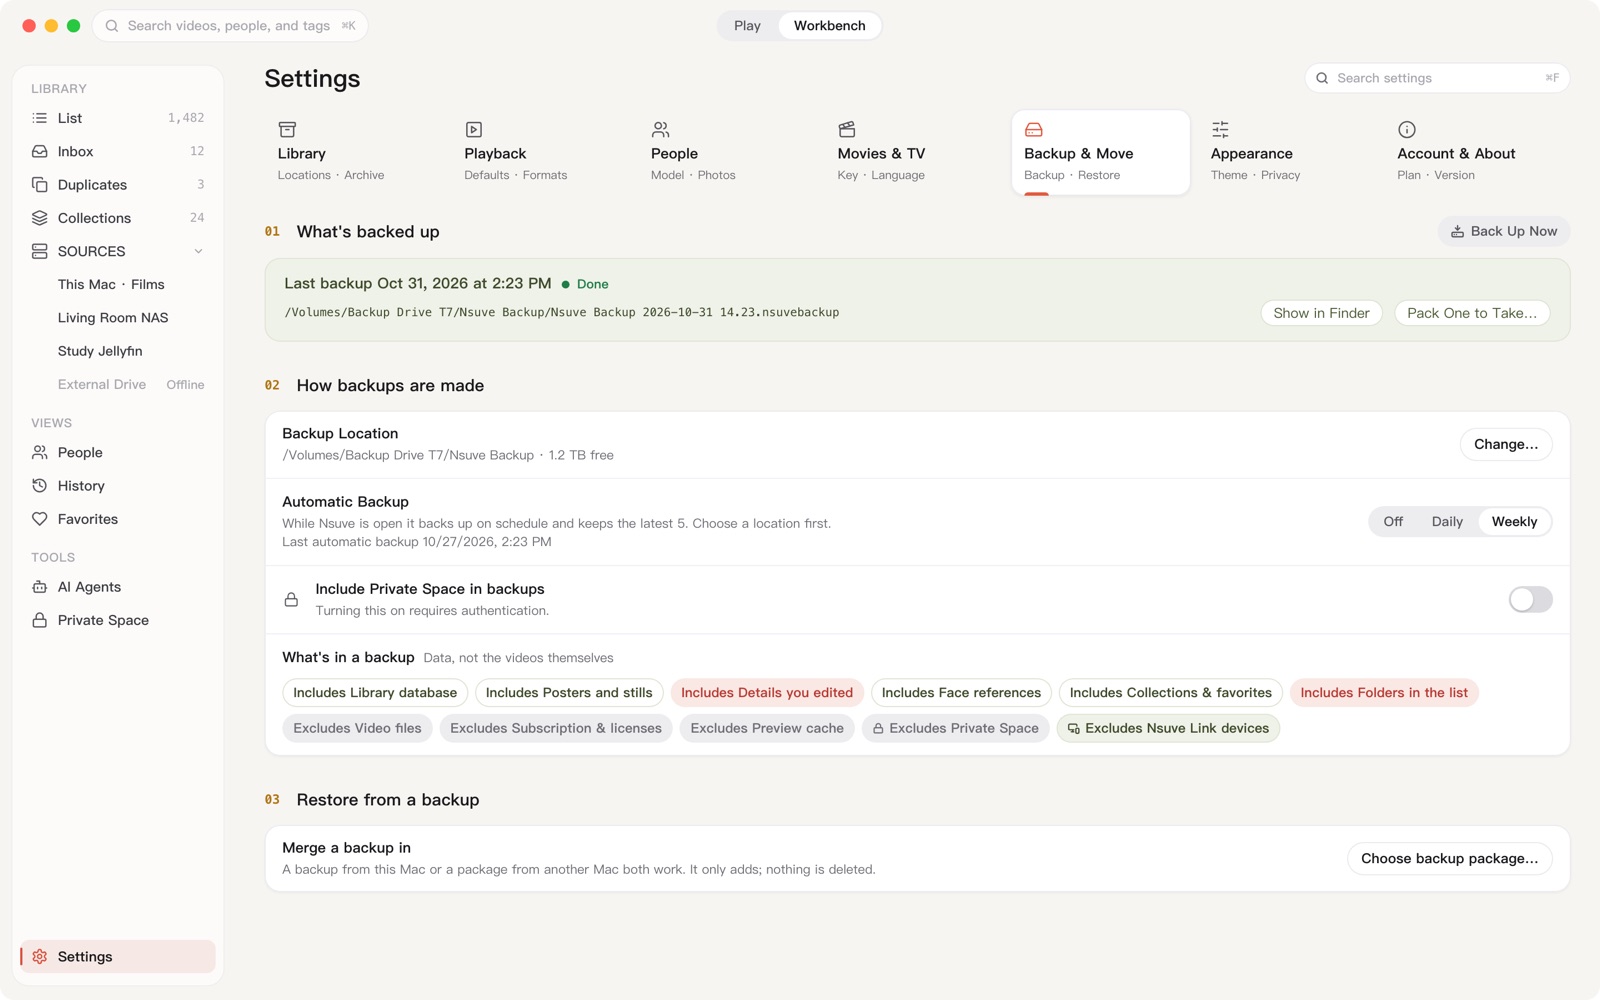
Press ⌘, to open Settings and choose Backup & Move. The "What's in a backup" row lists what's included and what isn't.
- Included: the library database, posters and stills, details you edited, face references, collections and favorites, and the folders in your list.
- Not included: video files, your TMDB key, subscription and licenses, the preview cache, and Nsuve Link devices. Private Space is left out by default too.
So you still need to look after the drive or folder your films live on. To bring Private Space along, turn on Include Private Space in backups; you'll be asked to authenticate once.
Make one backup, then let it run on its own
- Under "How backups are made", choose a folder for Backup Location, ideally on another drive. It can't be the same place as your library.
- Click Back Up Now. If you haven't chosen a location yet, you'll be asked to pick one first.
- When it's done, "What's backed up" shows the time and that it succeeded. Show in Finder takes you to the backup, a file ending in
.nsuvebackup. - Set Automatic Backup to Daily or Weekly. Nsuve backs up on schedule only while it's open, and keeps the latest 5.
If the app stays closed for weeks, no new automatic backups are made. Before a big reorganization or moving lots of files, make one by hand.
Move to a new Mac
- On the old Mac, open Settings → Backup & Move and click Pack One to Take…. Packing only reads your data, so a failure never leaves a half-finished package.
- Copy the package and your movie folder to the new Mac. An external drive, AirDrop or cloud storage all work.
- Open Nsuve on the new Mac and choose Restore from backup at first launch, or just double-click the package.
- Point to the movie folder and merge. Covers, people, collections, favorites and playback progress all come along.
Just moved your films to a new drive? In Settings → Library, point your library location at the new drive and Nsuve matches the files up again. For any that don't match, use Relink… in the film's details.
Restoring merges, it never overwrites
Whether the package comes from another Mac or is this Mac's own backup, restoring merges it in: whatever the backup has and this Mac is missing comes back, and nothing is deleted. Click Choose backup package… under Settings → Backup & Move and a window walks you through four steps:
- Choose a backup. Older
.nsuratorbackupfiles open too. - Where the movies are. The backed-up films need to be inside this Mac's library folder. Any it can't find yet can wait: after merging, use Relink… in a film's details.
- See what will change. Nsuve does a dry run first and shows how many films are new, how many are on both sides and how many can't be found. When the same film was changed on both sides, the later change wins and the other value goes in the receipt.
- Merge into this Mac. If a few items can't be written, choose to skip them and merge the rest.
If this Mac's Private Space has content, you'll unlock it before merging. If you'd rather not, choose Restore without Private Space: everything private in the backup is skipped, and nothing private is ever made public. If the backup comes from a newer version of Nsuve, update Nsuve on this Mac first.
On iPhone and iPad (coming soon)
The phone app has its own Manage → Backup and Restore, with a different backup format from the Mac's.
- Full Backup: the videos stored on the device plus all your organizing. Private Space is included by default and encrypted separately; turn off Include Private Space to leave it out.
- Metadata-Only Backup: just the data, with no videos and no Private Space.
On the new iPhone or iPad, choose Restore from a Backup File… and confirm once with Face ID (or Touch ID, or your passcode). Private Space comes back, still locked. The new device must be signed in to the same Apple Account with iCloud Keychain turned on. Moving with only the iPhone's own transfer (Quick Start, iCloud Backup) doesn't bring Private Space along.
Read next
- WatchingOne library. Six screens.What the Mac, iPhone, iPad and iPhone Duo each do, how Nsuve Link plays your Mac's films on a phone, and how one Pro purchase covers your devices.
- Getting startedFrom folders to a poster wallAdd folders, external drives and NAS shares to Nsuve and let it recognize your films and shows. Use local NFO files and artwork, fix a wrong match, and choose between the built-in Nsurator Library DB and your own TMDB key.