

Your library and your Inbox
Nsuve only ever moves files in two places: your library, where archived films live, and your Inbox, where new ones land first. Most people point the Inbox at their downloads folder. Every other folder or NAS in the list is indexed and never touched.
- Open Settings → Library and, under Where Your Videos Live, choose a folder for Library and one for Inbox. Grant access when asked.
- Turn on Update Inbox Automatically and new files appear in the Inbox on their own. With it off, you can refresh by hand.
The Inbox watches only the folder you chose, and files still downloading stay out of it: a file shows up once it's complete and its size has stopped changing.
Set your archive rules first
Before archiving, decide what archived films are called and where they go. In Settings → Library, scroll to Archive Folder Rules:
- Movies: Title (Release Year) by default, for example
Library/Movies/Dune Part Two (2024)/Dune Part Two (2024).mkv. - TV shows: Show / Season by default, one folder per season, with season and episode numbers like S01E03 in the file name.
- Personal videos: Source / Month by default.
For something else, choose Custom… and build a pattern from variables for the title, year, season, episode and more. Each rule shows a sample path underneath, so you can see the result before you commit.
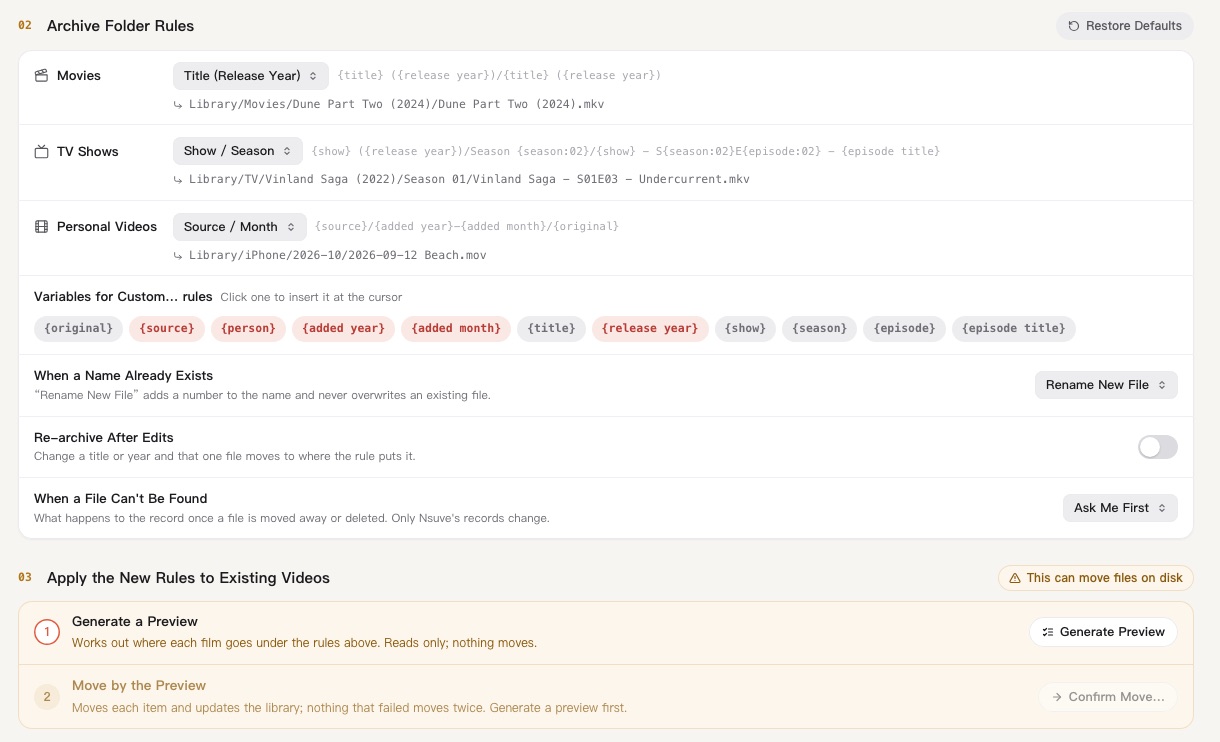
Three more settings sit on the same page:
- When a Name Already Exists: Rename New File adds a number to the new file's name and never overwrites the old one; Skip Archive leaves the new file in the Inbox.
- Re-archive After Edits: when this is on and you change a title or year, the file moves to where the rules now say it belongs.
- Apply the New Rules to Existing Videos: to bring older films in line with new rules, click Generate Preview first; it only reads and moves nothing. If the preview looks right, click Confirm Move…. Films in your Private Space are never moved.
Archive from the Inbox
Open Inbox in the sidebar. New films are looked up online and sorted into two lanes:
- Ready to Archive: recognized with confidence and good to go.
- Needs Review: guessed from the file name, close to several titles online, or already in your library. These wait for a quick look from you.
- Click a card. The panel on the right shows what it was recognized as, where it archives to, and the subtitles and NFO files that move along with it.
- If the name is wrong, edit it, or use Fix Match… to pick another title.
- For a film, click Archive. A whole season of a show is one card: Archive Season files it in one go. To archive everything that's ready, click Archive All.
- When it's done, a note confirms what was archived. Click Undo to take it back, or View in List to go and see it.
Need to stop partway? Click Stop: Nsuve finishes the file it's moving and stops there; whatever already moved stays in the library. Some cards can't be archived yet, say a file is missing, access hasn't been granted, or two files claim the same episode. The card says why. You can leave those alone; they stay in the Inbox.
Clear out duplicates
Open Duplicates in the sidebar. The copies of each film are grouped so you can compare them:
- Identical: checked byte for byte; the contents are the same.
- Contents Differ: they may carry different subtitles, audio tracks or picture quality. Look at each one before deciding; bigger or newer isn't always better.
Each copy is marked with what will happen to it: Keep · Suggested, Keep or Will Move. Click a row to change it.
- Open a group and check the full location of every copy. Make sure the one you're keeping is the one you want.
- Click Apply Suggestion for that group, or Apply All Suggestions for every group; the button shows how much space you'll free.
- Copies you move go to the system Trash first. Changed your mind? Put them back from the Trash.
To stop seeing a group, choose Ignore This Group. Deep Scan… also compares copies that were renamed; it takes longer. Only copies in your library and Inbox can be moved from here.
Read next
- OrganizingOne theme, one listGroup films by hand, let a tag build a smart collection for you, and keep what's private in Private Space.
- Going furtherNew Mac, same libraryWhat a backup holds, how to schedule one, and how to take your organized library to a new Mac or a new drive. Restoring only merges; it never overwrites.